Instructions for Using a Convector Panel
- Unboxing and Inspection
- Choosing the Right Location
- Installation
- Step 1: Mark the Mounting Points
- Step 2: Drill Holes
- Step 3: Insert Wall Plugs
- Step 4: Attach Mounting Brackets
- Step 5: Hang the Panel
- Step 6: Plug In the Panel
- Initial Setup and Configuration
- Step 1: Power On
- Step 2: Set the Desired Temperature
- Step 3: Select the Mode
- Step 4: Set the Timer (Optional)
- Operating the Convector Panel
- Maintenance and Cleaning
- Step 1: Turn Off and Unplug
- Step 2: Dust the Surface
- Step 3: Clean the Vents
- Step 4: Inspect for Damage
- Step 5: Check the Thermostat
- Troubleshooting Common Issues
- Energy-Saving Tips
- Conclusion
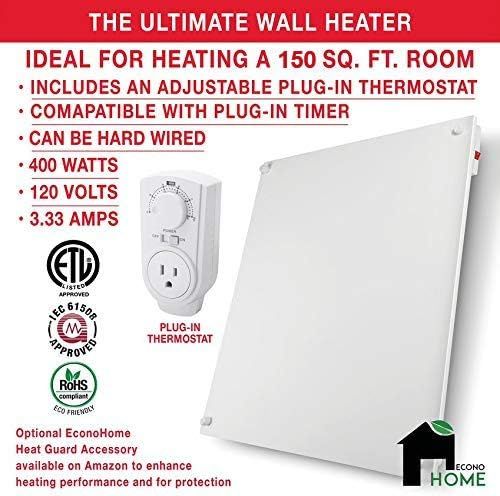
Convector panels are a popular and efficient heating solution for homes, offices, and other indoor spaces. These panels use convection to circulate warm air, providing consistent and comfortable heat. If you've recently purchased a convector panel or are considering one, it's essential to understand how to use it properly to maximize its efficiency and lifespan. This guide will walk you through the steps for using a convector panel, from installation to maintenance.
Unboxing and Inspection
Before you begin, carefully unbox your convector panel and inspect it for any visible damage. Ensure that all components, including the panel, mounting brackets, screws, and user manual, are present. If you notice any damage or missing parts, contact the manufacturer or retailer immediately.
Choosing the Right Location
Selecting the optimal location for your convector panel is crucial for its performance. Consider the following factors:
-
Wall Space: Choose a wall with sufficient space to accommodate the panel. Avoid placing it behind furniture or other obstructions that could block airflow.
-
Power Outlet: Ensure that the chosen location is near a power outlet. Avoid using extension cords, as they can pose a safety hazard.
-
Height: Mount the panel at a height that allows for optimal air circulation. Typically, this is a few inches above the floor.
-
Proximity to Windows: Placing the panel near windows can help counteract cold drafts, but avoid direct contact with curtains or blinds.
Installation
Once you've chosen the location, follow these steps to install your convector panel:
Step 1: Mark the Mounting Points
Hold the panel against the wall in the desired location. Use a pencil to mark the positions of the mounting holes on the wall.
Step 2: Drill Holes
Using a drill, create holes at the marked points. Ensure that the holes are the appropriate size for the wall plugs provided.
Step 3: Insert Wall Plugs
Insert the wall plugs into the drilled holes. These will provide a secure anchor for the screws.
Step 4: Attach Mounting Brackets
Secure the mounting brackets to the wall using the screws provided. Ensure that the brackets are level and firmly attached.
Step 5: Hang the Panel
Carefully hang the convector panel on the mounting brackets. Ensure that it is securely in place and level.
Step 6: Plug In the Panel
Plug the convector panel into the nearest power outlet. Ensure that the cord is not pinched or stretched.
Initial Setup and Configuration
After installation, you'll need to configure the settings on your convector panel. Most modern panels come with a digital thermostat and various control options. Follow these steps to set up your panel:
Step 1: Power On
Turn on the convector panel using the power button or switch. The panel should display the current temperature and settings.
Step 2: Set the Desired Temperature
Use the thermostat controls to set your desired temperature. Most panels allow you to adjust the temperature in increments of 1°C or 1°F.
Step 3: Select the Mode
Many convector panels offer different heating modes, such as eco mode, comfort mode, and anti-frost mode. Choose the mode that best suits your needs:
-
Eco Mode: Energy-efficient mode that maintains a lower temperature.
-
Comfort Mode: Provides consistent and comfortable heating.
-
Anti-Frost Mode: Prevents the room from freezing during cold weather.
Step 4: Set the Timer (Optional)
If your panel has a timer function, you can program it to turn on and off at specific times. This is useful for maintaining a comfortable temperature while conserving energy.
Operating the Convector Panel
Once the initial setup is complete, operating your convector panel is straightforward. Here are some tips for efficient use:
-
Regular Monitoring: Keep an eye on the room temperature and adjust the settings as needed. Avoid setting the temperature too high, as this can lead to unnecessary energy consumption.
-
Air Circulation: Ensure that the area around the panel is clear to allow for proper air circulation. Avoid placing objects directly in front of or above the panel.
-
Safety Precautions: Never cover the panel with clothing, towels, or other materials, as this can cause overheating and pose a fire hazard.
Maintenance and Cleaning
Regular maintenance is essential to keep your convector panel functioning efficiently and safely. Follow these steps to clean and maintain your panel:
Step 1: Turn Off and Unplug
Before cleaning, turn off the panel and unplug it from the power outlet. Allow it to cool down completely.
Step 2: Dust the Surface
Use a soft, dry cloth to dust the surface of the panel. Avoid using water or cleaning solutions, as these can damage the electrical components.
Step 3: Clean the Vents
Use a vacuum cleaner with a brush attachment to remove dust and debris from the vents. This will ensure proper airflow and prevent overheating.
Step 4: Inspect for Damage
Regularly inspect the panel for any signs of damage, such as cracks, loose screws, or frayed cords. If you notice any issues, contact a professional for repairs.
Step 5: Check the Thermostat
Ensure that the thermostat is functioning correctly by comparing the displayed temperature with a separate thermometer. If there are discrepancies, recalibrate or replace the thermostat as needed.
Troubleshooting Common Issues
Even with proper use and maintenance, you may encounter some common issues with your convector panel. Here are some troubleshooting tips:
-
Panel Not Heating: Ensure that the panel is plugged in and the power outlet is functioning. Check the thermostat settings and adjust if necessary.
-
Inconsistent Heating: Verify that the room is properly insulated and that there are no drafts. Ensure that the panel is not obstructed and that the vents are clean.
-
Unusual Noises: If the panel makes unusual noises, such as buzzing or rattling, it may indicate loose components or debris in the vents. Turn off the panel and inspect it for any issues.
-
Overheating: If the panel feels excessively hot or shuts off unexpectedly, it may be overheating. Ensure that the vents are clear and that the panel is not covered. If the issue persists, contact a professional.
Energy-Saving Tips
To maximize the efficiency of your convector panel and reduce energy consumption, consider the following tips:
-
Use a Programmable Thermostat: Set the thermostat to lower the temperature when the room is unoccupied or during nighttime.
-
Insulate the Room: Proper insulation can help retain heat, reducing the need for constant heating.
-
Close Doors and Windows: Keep doors and windows closed to prevent heat loss and drafts.
-
Regular Maintenance: Clean and maintain the panel regularly to ensure optimal performance.
Conclusion
Using a convector panel is an effective way to provide consistent and comfortable heat in your home or office. By following these instructions for installation, setup, operation, and maintenance, you can ensure that your panel functions efficiently and safely. Regular care and attention will not only extend the lifespan of your convector panel but also help you save on energy costs. Whether you're using it as a primary heat source or a supplementary one, a well-maintained convector panel can enhance your indoor comfort during the colder months.


